
ELECTRICAL
Last updated: April 2026
Disclosure: Dust Collector Reviews is a participant in the Amazon Associates Program, an affiliate advertising program designed to provide a means for sites to earn advertising fees by linking to Amazon.
That old light switch has seen better days. Maybe it’s cracked, outdated, or just doesn’t match your renovated kitchen. Whatever the reason, replacing a light switch is one of the easiest electrical projects you can tackle.
With basic tools and 15 minutes, you can swap out a switch — no electrician required. Let’s do it.
What You’ll Need
- New light switch (single-pole, three-way, or dimmer as needed)
- Flathead screwdriver
- Phillips screwdriver
- Wire Stripper
- Voltage tester (non-contact preferred)
- Wire nuts (usually included with new switch)
Check Current Price on Amazon – Dimmer Switch
Check Current Price on Amazon – Screwdriver Set
Types of Light Switches
Before you buy, know what type you need:
- Single-pole switch — controls one light from one location. Most common.
- Three-way switch — controls one light from two locations (e.g., top and bottom of stairs).
- Dimmer switch — allows you to adjust light brightness.
- Smart switch — WiFi-enabled for app or voice control.
Take a picture of your current switch before buying to ensure you get the right type.
Step-by-Step: Replace Your Light Switch
Step 1: Turn Off the Power
Go to your circuit breaker panel and turn off the breaker that controls the switch you’re replacing. Use your voltage tester to confirm the power is off — touch it to the wires in the box.
Critical: Never skip this step. Electricity is dangerous.
Step 2: Remove the Old Switch
Remove the faceplate (usually held by screws) and then the switch from the electrical box. You’ll see wires connected to the switch terminals.
Step 3: Document the Wiring
Take a photo or draw a diagram of how the wires connect. This is crucial for three-way switches, which have more wires.
Step 4: Disconnect the Wires
Loosen the terminal screws and remove the wires. Note: Some switches have back-wire holes; release those by inserting a small screwdriver.
Step 5: Connect the New Switch
Connect the wires to the new switch exactly as they were on the old one:
- Black (hot) wire → brass or black screw
- White (neutral) wire → usually not connected on simple switches
- Bare (ground) wire → green screw
For three-way switches, you’ll also have a red “traveler” wire.
Step 6: Secure the Switch
Carefully fold the wires into the box and mount the new switch with screws. Attach the faceplate.
Step 7: Test It
Turn the breaker back on and test the switch. If it doesn’t work, turn off the power and check your connections.
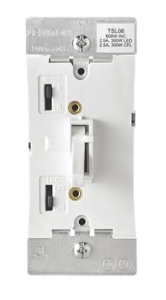
Installing a Dimmer Switch
The process is similar, with a few extra steps:
- Make sure your light bulbs are dimmable — LED bulbs must be labeled dimmable.
- Some dimmers need a neutral wire — check your box wiring.
- Follow the manufacturer’s wiring diagram included with your dimmer.
Check Current Price on Amazon – Dimmer Switch
Common Mistakes to Avoid
- Not turning off the power — extremely dangerous
- Forgetting the ground wire — modern code requires grounding
- Mixing up three-way wires — causes erratic behavior
- Overtightening screws — can crack the switch
Not sure about the wiring? Our guide on Outlet Not Working? Try This First covers similar concepts.
When to Call an Electrician
Call a professional if:
- The switch box has aluminum wiring (common in 1970s homes)
- You need to add a new circuit
- The wiring is damaged or frayed
- You’re installing a smart switch and need neutral wire
- The switch is in a wet location (bathroom, kitchen) requiring special-rated equipment
For more help deciding, check out When to Call a Plumber vs DIY — the same logic applies to electrical work.
Conclusion
Changing a light switch is a beginner-friendly project that makes a big difference in your home. With the power off and a few tools, you can upgrade any switch in minutes.
Pick up a new switch at your hardware store and upgrade your walls today.
This article was last updated April 2026.
Tags: how to change a light switch, light switch replacement, DIY electrical, electrical safety, install dimmer switch